Getting Started
Advantages of Webix Jet
Webix Jet allows you to create flexible, easily maintainable apps, where data and visual presentations are clearly separated, interface elements can be easily combined and reused, all parts can be developed and tested separately - all with minimal code footprint. It has a ready to use solution for all kinds of tasks, from simple admin pages to fully-fledged apps with multiple locales, customizable skins, and user access levels.
Webix Jet is a fully client-side solution and can be used with any REST or GraphQL-based data API. So there are no special requirements to the server.
How to Start
To begin with, you can grab the app package from https://github.com/webix-hub/jet-start/archive/master.zip and unpack it locally. After that, run the following commands in the target folder (this assumes that you have Node.js and npm installed):
You can also use yarn:
Next, open http://localhost:5173 in the browser. You will see the application interface. Let's have a look at what it has inside.
The Application Structure
The codebase of the app consists of:
the index.html file that is a start page and the only html file in the app;
the sources/myapp.js file that creates the app and contains app configuration;
the sources/views folder containing modules for interface elements;
the sources/models folder that includes modules for data operations;
the sources/styles folder for CSS assets;
the sources/locales folder for app locales (you can ignore it for now).
How it Works
The basic principle of creating an app is the following. The app is a single page. It is divided into multiple views, which are kept in separate files. Thus, the process of controlling the behavior of the app gets much easier and quicker.
Navigation between pages works when the URL of the page changes. The URL of the app is divided by a hashbang (#!) into two parts:
the main URL that is the web address of the app,
the app URL fragment that defines the UI (#!/some/part).
This is a single page app, that is why only the part of the URL after the hashbang will change. The framework will react to the URL change and rebuild the interface from these elements.
The app splits the app URL into parts, finds the corresponding files in the views folder and creates an interface by combining UI from those files.
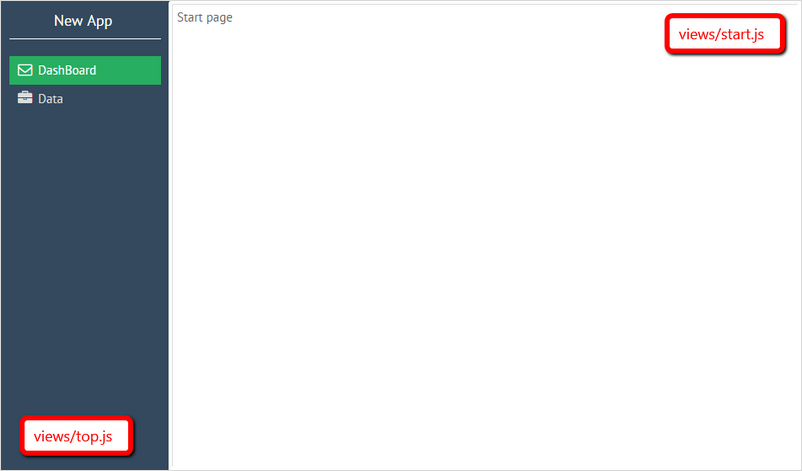
For example, there are three files in the views folder of the app:
top.js
start.js
data.js
If you set the path to /#!/top/start, the interface described in the views/top.js file will be rendered first. Then the interface from views/start will be added in some cell of the top-level interface:
/#!/top/start
Defining a View Module
views/start
The start.js file describes a start page view:
This is a module that returns a template with the text of the page.
You can look at this page by opening the URL /#!/start.
views/top
The views/top module defines the top level view, that contains a menu and includes the start page view that has been described above. Schematically, this is how top is defined:
In the above code, there is a layout with two columns. At the top of the file, there is the list of dependencies, which will be used in this layout.
Open the path /#!/top, and you will see the page with the start view inside of top.
This module returns an object that differs from start. There are two variants of the return object:
a mere description of the interface (as in start),
a JetView-based class (as in top).
A JetView-based class can have:
the config() method that returns the interface of the component that will be initialized. In this example, it's a layout with a menu and start view next to it;
the lifetime handler methods that specify the component behavior during its life cycle.
Creating Subviews
As it has already been said, the app consists of a single page. How is the view composition organized?
Check out the following code:
The line { $subview: true } implies that other modules can appear inside of the top module. The next segment of the URL after top will be loaded into this structure. So for rendering the interface with a particular subview, put its name after /#!/top/ -- for example /#!/top/start. The { $subview: true } placeholder will be replaced with the content of a subview file (views/start.js in the above example) and the corresponding interface will be rendered.
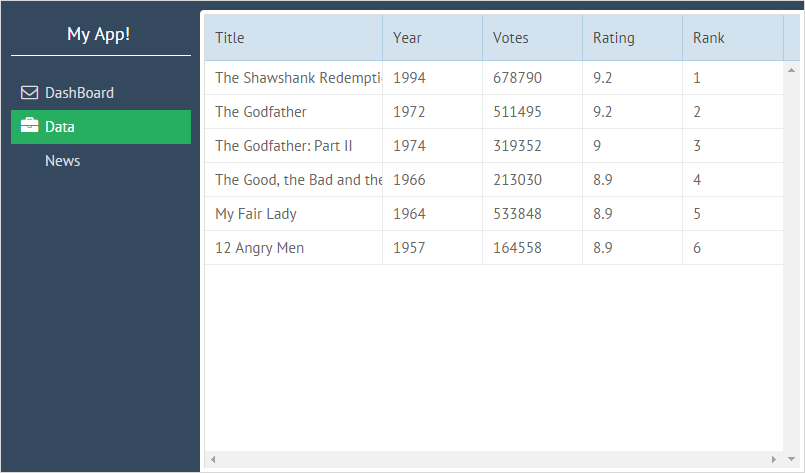
For example, there is a data.js view, which contains a datatable. If you enter the URL /#!/top/data, you will get the interface with a menu on the left and a datatable on the right:
/#!/top/data
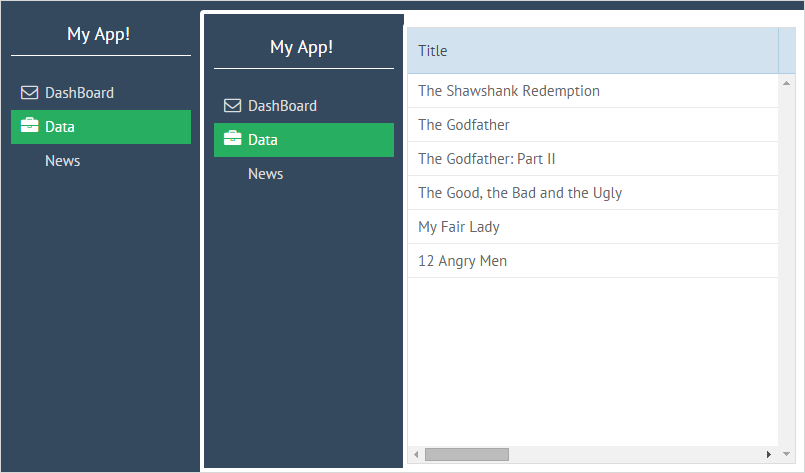
Then, add one more /top subdirectory into the path. The URL will be /#!/top/top/data and the app will have another menu view inserted into the first one:
/#!/top/top/data
The described way of inserting subviews into the main view is an alternative to specifying the necessary subview directly in the main view code.
For more details on including subviews and in-app navigation, read the following chapters:
Loading Data with Models
While views contain the code of interfaces, models are used to control the data. Let's consider data loading on the example of the views/data.js file. It takes data from the models/records module. records.js in the demo returns a data collection with local data.
The model can also return data from a backend, e.g.:
The views/data module, which uses the model, has the following code:
This module returns a JetView-based class with two methods:
the config() method that returns the interface of the component that will be initialized. In this example, it's a datatable;
the init() method that specifies the component initialization behavior. When the component is created, data from the records model will be loaded into it.
For more details about data loading, read:
Last updated