Jet Recipes

In this section you'll find elegant solutions for some common tasks.

Access Guard - View Level

Task: You want to create views with several levels of access for different groups of users.

Solution: Just add a check in config.
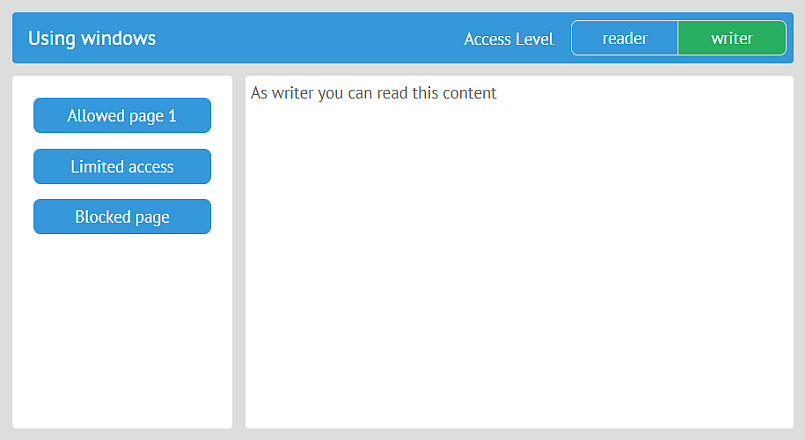
Limiting Content

For example, you have two user groups: readers and writers. You want to display some of the app contents depending on the group.

This is the UI component with contents that you want to show to readers:

export default class limited extends JetView{
    config(){
        return { 
        view:"form", rows:[
            { label:"Name", view:"text" },
            { label:"Email", view:"text" },
            {}
        ]};
    }
}

And this is the version of the same component you want to show to writers:

export default class limited extends JetView{
    config(){
        return { 
            view:"form", rows:[
                { label:"Name", view:"text" },
                { label:"Email", view:"text" },
                { view:"text", label:"Salary" },
                { view:"button", value:"Delete" },
                {}
            ]
        };
    }
}

The solution is to create one common view and to configure its UI depending on the user group. The name of the current group will be stored in the app config. Let's add a property with a default group name into the app config:

// myapp.js
const app = new JetApp({
    access:        "reader",
    start:        "/top/limited"
});

top is a view with a side menu and a toolbar. top includes limited as its subview. Next, let's define the UI of limited for default users (readers):

// views/limited.js
import {JetView} from "webix-jet";

export default class limited extends JetView{
    config(){
        const ui = { view:"form", rows:[
            { label:"Name", view:"text" },
            { label:"Email", view:"text" },
            {}
        ]};

        return ui;
    }
}

Next, let's add a check in config and change the view configuration for writers:

// views/limited.js
import {JetView} from "webix-jet";

export default class limited extends JetView{
    config(){
        const ui = { view:"form", rows:[
            { label:"Name", view:"text" },
            { label:"Email", view:"text" }
        ]};

        if (this.app.config.access == "writer"){
            ui.rows.push({ view:"text", label:"Salary" });
            ui.rows.push({ view:"button", value:"Delete" });
        }

        ui.rows.push({});

        return ui;
    }
}

this.app.config.access gets to the access level of the current user. If you use the User plugin, you can get the user name with getUser and check the group name.

For the demo, the user group is changed by a control in top:

// views/top.js
import {JetView} from "webix-jet";

export class TopView extends JetView {
    config(){
        return {
            type:"space", rows:[
                { view:"toolbar", cols:[
                    { view:"segmented", label:"Access Level",
                        value:this.app.config.access,
                        options:["reader","writer"], click:function(){
                            // change access level, for demo only 
                            const app = this.$scope.app;
                            app.config.access = this.getValue();
                            webix.delay(function(){
                                app.refresh();
                            });
                    }}
                ]},
                { $subview: true }
            ]
        };
    }
}

webix.delay calls refresh in 1 ms to ensure that the app config has been reset before repainting the app.

Blocking Content

Here's an example of blocking a view for readers:

// views/blocked.js
import {JetView} from "webix-jet";

export default class blocked extends JetView{
    config(){
        if (this.app.config.access != "writer"){
            return { };
        }

        return { template:"As writer you can read this content" };
    }
}

You can show this view via top/blocked.

Check out this solution on GitHub >>

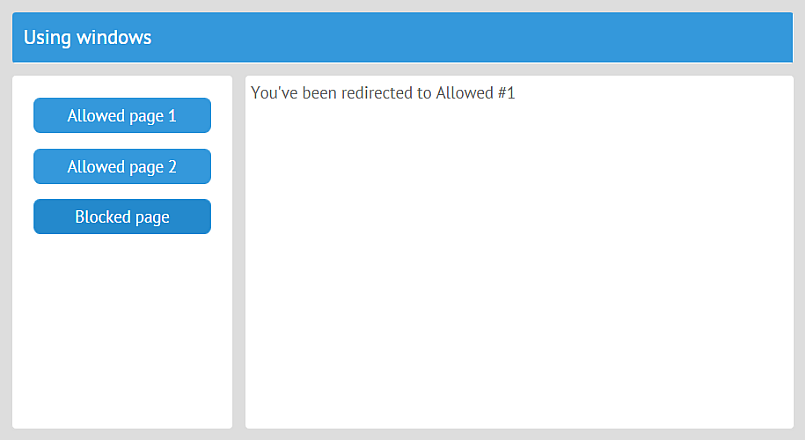
Access Guard -- App Level

Task: You want to create views with several levels of access for different groups of users.

Solution: use the app:guard event.

The app:guard event is triggered before navigation to another view.

Here's how you can attach a handler to app:guard:

// myapp.js
...
app.attachEvent("app:guard", function(url, view, nav){
    if (url.indexOf("/blocked") !== -1)
        nav.redirect="/somewhere/else";
})

The event handler receives three parameters:

  • url - a string with the attempted URL

  • view - the parent view that contains a subview that you want to block (blocked in this example)

  • nav - an object that defines navigation to the next view

nav has three properties:

  • redirect is the new URL; in the example above, it's corrected by the guard

  • url is the URL split into an array of URL elements

  • confirm is a promise that is resolved when the app:guard event is called

Here's how you can block a view and redirect users to some allowed subview:

// myapp.js
const app = new JetApp({
    start: "/top/blocked"
});
app.attachEvent("app:guard", function(url, view, nav){
    if (url.indexOf("/blocked") !== -1){
        nav.redirect = "/top/allowed";
    }
});
app.render();

Check out the solution on GitHub >>

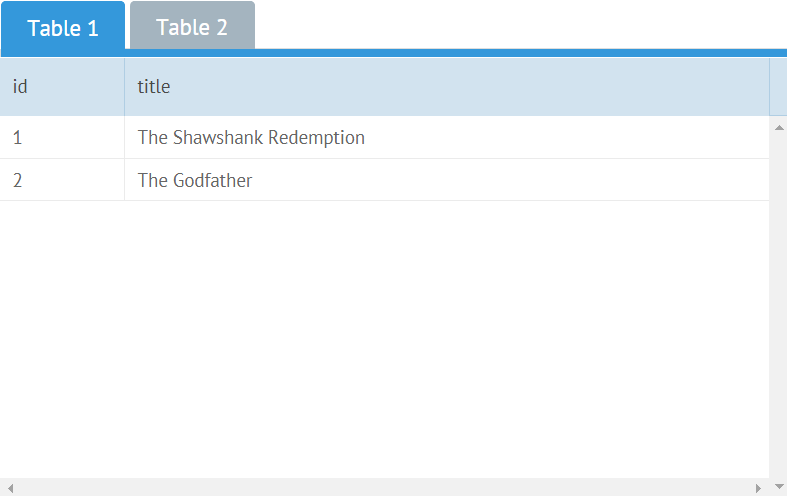
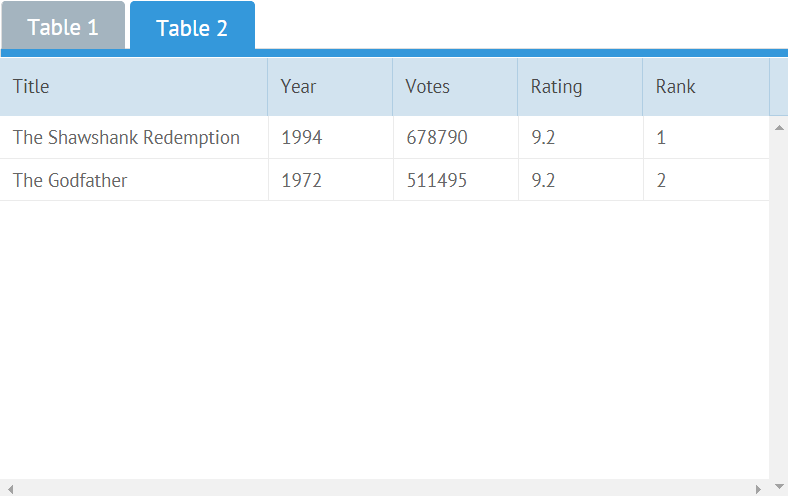
Responsive UI - Sizing UI to Device

Task: You want to create a responsive UI.

Solution:

1. ...is partly available out of the box (by Webix UI)

Webix UI resizes components automatically if you don't set fixed sizes. If you minimize your browser window or open the app from a smartphone, components will shrink. However, this is not enough if you want to reorganize your components, e.g. if for wide screens you want to display the layout in columns and for narrower screens in rows, in tabs or simply display less content.

2. Just add a check in config :)

Suppose you want to distinguish two types of screens: small (less than 800px) and wide. (800 is just a number, you can choose the one you suppose is right). And there are two datatables (ListA and ListB) you want to display in two columns for wide screens and in two tabs for small screens.

Defining the Screen Type

Add a property to app config and initialize it with a function that will calculate the width of the screen and set the screen type:

// myapp.js
webix.ready(() => {
    const app = new JetApp({
        start: "/start"
    });
    const size =  () => document.body.offsetWidth > 800 ? "wide" : "small";
    app.config.size = size();
    app.render();
});

This ensures that when the app is rendered, the correct type of the screen is defined. This, nevertheless, doesn't solve the problem of dynamic resizing.

To make the app UI responsive and dynamic, you'll have to handle the resize event:

// myapp.js
webix.ready(() => {
    const app = new JetApp({
        //config
    });

    const size =  () => document.body.offsetWidth > 800 ? "wide" : "small";
    app.config.size = size();
    webix.event(window, "resize", function(){
        const newSize = size();
        if (newSize != app.config.size){
            app.config.size = newSize;
            app.refresh();
        }
    });

    app.render();
});

webix.event attaches an event handler to the resize event of a browser window. On window resize, the screen type will be redefined and changed if necessary. Don't forget to refresh the app.

Responsive Layout

Here's how you can change the layout according to the size of the screen. For small screens, the components will be put in tabs, and for wide screens they will be put side by side:

// views/start.js
import {JetView} from "webix-jet";

export default class StartView extends JetView {
    config(){
        switch(this.app.config.size){
            case "small":
                return {
                    view:"tabview", tabbar:{ optionWidth:100 }, cells:[
                        { body: { rows:[ ListA ]}, header:"Table 1" },
                        { body: { rows:[ ListB ]}, header:"Table 2" }
                    ]
                };
            case "wide":
                return {
                    type:"space", cols:[
                        ListA,
                        ListB
                    ]
                };
        }
    }
}

Responsive Content

One more way to make your app responsive is to display less content for small screens. Let's leave only two columns in one of the datatables for small screens:

// views/listb.js
import {JetView} from "webix-jet";
import {data} from "../models/records";

export default class ListB extends JetView {
    config(){
        const config = {
            view:"datatable",
            editable:true
        };

        switch(this.app.config.size){
            case "small":
                config.columns = [
                    { id:"id" },
                    { id:"title", fillspace:true }
                ];
                break;
            default:
                config.autoConfig = true;
                break;
        }

        return config;
    }
    init(view){
        view.parse(data);
    }
}

Check out the solution on GitHub >>

Last updated